 Today I thought I would just show the process I used for repairing the two pieces of furniture for my client. They are minor repairs that I was able to do while here working on the Living Room and galley Kitchen. This piece, a deacon’s bench, had been chewed by a dog. I sanded and plastered.

I lucked out and was able to find a base paint that was a very close match and felt I was almost done with the repair after applying 2 coats!
 It’s hard to see in this final picture, but I did add a little, very fine graining in a deeper brown. Unfortunately, I was not thinking I needed a high gloss sealer and only had a matte sealer with me for the 2nd piece of furniture. I applied this, but will see if the carpenter who is doing some other work at this home will add a little high gloss poly to this corner.
 Next, I tackled the cabinet that had the burn mark and finish that was worn off when someone tried to make the burn mark disappear. In this photo, I have already sanded the area, filled the
burn hole and put on two thin layers of a pale yellow base paint.

The top of this cabinet has some hand painted flowering vines in each of the 4 corners. The left hand corner was damaged from cleaning with a solvent and from the cigarette burn repair.

I thought I would just trace one of the other corners that was in tact, flip the tracing paper over and transfer into the opposite corner.
 This is the corner I traced. But, then I decided the design was so simple, that it would just be easier for me to flip my traced corner vine over and copy it vs. doing a tracing.
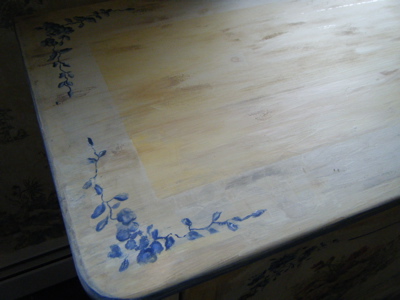
That seemed to work well for me.

I added a few more dark blue tones and highlights, then sealed with a matte sealer.


I myself is into furniture repair and restoration instead of just throwing the old or broken furniture away.